
Textured Sweater Nails Are the Coolest Cold Weather Nail Trend Taking Over Your Feed
Plus they're easy to recreate.
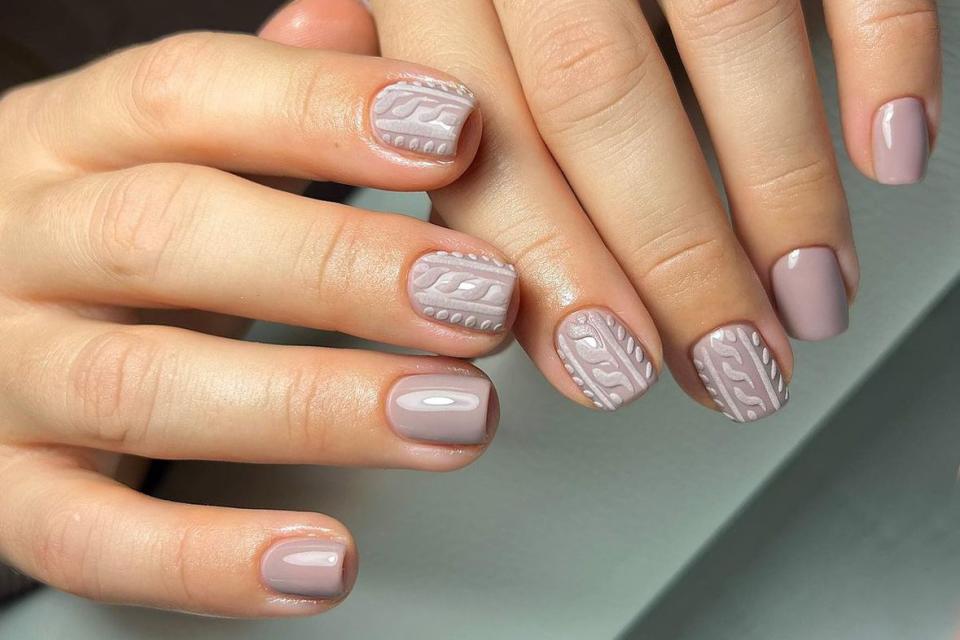
@learnahstarbuck_nailartist/Instagram
With their 3D texture and soft hues, cute and cozy sweater nails elicit excited oohs, ahhs, and compliments galore. But how do you create sweater nails, and is it something you can DIY yourself? As tricky as this nail art appears, sweater nails are actually not too difficult to recreate, and they look great on nails of all lengths. We asked a couple nail techs to give us the full rundown on how to create sweater nails so you can show off this look all season long.
RELATED: Latte Nails Is the Subtle Fall Manicure Trend You're Going to See Everywhere
What Are Sweater Nails?
Sweater nails create the look of teeny, cute and cozy knitwear right on your fingernail. They typically feature a softly raised design, usually done in a pastel or rich seasonal hue, that “evokes the texture and patterns commonly seen on sweaters,” says Linh Ngo, manicurist and advisor for Nail Maxx.
Other sweater nail varieties exist, including non-textured painted argyle and fair isle nail designs. However, when someone says “sweater nails” they’re typically referring to the textured knit effect.
Sweater Nail Art Tutorial: Step-by-Step Guide
If the 3D texture of sweater nails blows your mind, you’re not alone. While it looks super complicated, the designs are actually pretty simple to recreate. The texture is created via gel nail polish applied with a fine nail art brush and some loose acrylic powder. Here’s the full tutorial on how to create sweater nails at home.
Step 1: Gather Your Supplies
Here’s what you’ll need to create sweater nails:
Gel nail polish
Fine nail art brush and/or dotting tool
Loose clear acrylic powder
Alcohol
Matte top coat
Step 2: Prep Your Nails & Apply a Base Coat
Do not forget to prep your nails at the beginning. Ngo says this includes removing all old polish, cleaning, shaping, and buffing. “Remember that a smooth canvas is easier to work with in such nail art,” she says. After, apply the base coat.
Step 3: Paint Your Nails
Using gel nail polish, paint your nails your preferred color and then cure under the UV light for 60 seconds, says nail artist Alma Tobias, educator for V Beauty Pure.
Step 4: Create Your Sweater Design
One nail at a time, dip your nail brush or dotting tool into the same gel polish and draw on a sweater-like design. Ngo likes to use a criss-cross pattern that mimics the appearance of knit stitches. You can also do open circles, squiggles, lines, and dots.
It’s important to work quickly and on one nail at a time since the gel can flatten and spread, which will compromise your design. If it’s an intricate design or you work slowly, you may even want to work in sections of a nail versus the entire nail at once.
Step 4: Dust with Acrylic Powder
Do not cure your nails under the UV after creating the design with your gel polish, Tobias says. Instead, lightly dust your nails with loose, clear acrylic powder. Make sure the design is coated well. You can use a cuticle pusher for this or a small spoon.
Step 5: Cure the Design
Cure the design for 60 seconds under a UV light, then brush away excess powder with a clean brush. If you’re working in small sections, run a pad lightly dipped in alcohol over the nail to clean it, then continue adding to your design. Repeat the dusting and curing process as needed until the design on each fingernail is complete.
Step 6: Apply a Matte Top Coat
Seal your design with a matte topic to further mimic the softness of a real sweater.
For more Real Simple news, make sure to sign up for our newsletter!
Read the original article on Real Simple.

